
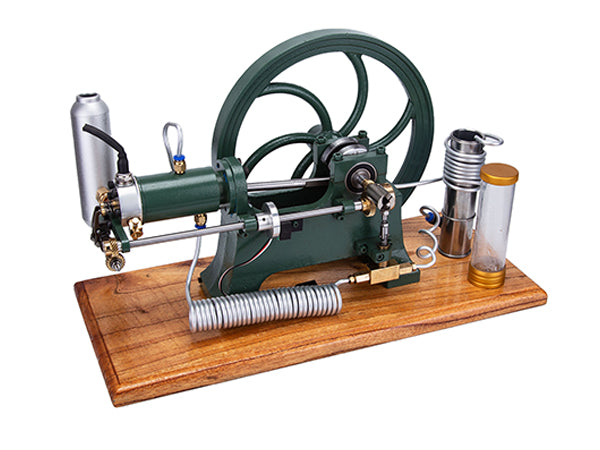
How to Start the Vintage Horizontal Stationary Engine Model?
Specifications
Color: Dark green
Material: Metal & Wood
Frame: Cast iron, dark green paint
Flywheel: Cast iron, dark green paint, 225mm diameter, 20mm thickness
Base: lotus seed wood, red paint
Weight: About 6.5kg
Length: 350mm
Height: 230mm
Bore: 22mm
Stroke: 24mm
Status: Ready to run
Cooling Mode: Water cooling
Start Mode: Rotate the crank handle to turn the flywheel or use the electric drill
Ignition Mode: CDI igniter
Spark Plug Type: 1/4-32 thread ME8 spark plug
Lubrication Mode: Mixed oil splash lubrication (Gasoline / Oil = 25/1 )
Fuel Type: Premium gas(92# and above gasoline)
Oil Type: 2T oil
Starting Power: 6 to 10V
Functions: Compression ratio, cam, and ignition time adjustable
Engine Starting Instructions
(1) Insert 2S-3S lithium battery into the igniter power cable connector, connect the black negative wire to the bottom of the engine, and lock the screw to fix. It can be ignited after power up. Or connect the power adapter with the USB interface cable.
(2) Turn the oil needle counterclockwise, rotate the flywheel to draw the fuel into the terminal of the fuel pipe, and then close the oil needle clockwise.
(3) Start the engine with the electric drill in your right hand (or rotate the crank handle), and slowly rotate the oil needle counterclockwise with your left hand until it catches fire.
Diagnosing Non-ignition – Problems and Causes
The below 6 problems may lead to failure to start. Please learn the theory first for beginners before disassembling and repairing it.
- Serious compression loss in the cylinder
It may be caused by deformation of the intake valve and exhaust valve or carbon deposition. Rotate the flywheel to move the piston to BTDC and tap the leaking valve with a small wooden hammer quickly and gently, which can remove burrs, carbon deposits, and other debris by vibration. Disassemble and regrind the valve if it is needed in severe scenarios.
- Flooded cylinder
The spark plug is short-circuited due to too much oil inhalation and no spark is found. Unplug the spark plug wire and then turn the flywheel in the opposite direction to discharge the excess oil. If necessary, disassemble the spark plug and wipe the ignition position.
- Check the setting of ignition advance angle, which is the angle of power stroke from TDC conversion of the compression stroke.
- Check the intake and exhaust angle settings.
- Check the load status of the engine. Excessivepiston friction will trigger high-temperature shutdown protection. Please cool it to less than 100 degrees before starting.
- Check whether the igniter works normally and whether the power supply battery is sufficient.
Engine Debugging Method
Cam Adjustment:
- Turn the camside toward yourself, rotate the flywheel. Adjust the position of the left cam when the piston moves to BTDC (intake stage). Slightly tighten the cam screw when the left cam is just touching the rocker arm of the valve.
- Continue to turn the flywheel. Adjust the right cam position when the piston moves to TDC (exhaust stage). Tighten the cam screw when the right cam is touching the rocker arm of the valve.
Ignition Timing Adjustment:
When the piston enters the compression stroke stage, the piston is near BDC. When the piston reaches the TDC near the end of the compression stroke, the ignition timing is optimal.
Smoke Ring Principle
It is non-cylinder ignition, but the negative pressure ignition in the cylinder head promotes the piston work. The high-pressure exhaust is compressed into the copper pipe connected to the exhaust pipe to convert the spiral air flow into a stable air flow and is driven to the exhaust cylinder for shock, and finally, smoke rings are emitted from the O-shaped chimney mouth.
To generate smoke rings, please adjust the speed to 800 to 1000 RPM.
To generate dense smoke rings, please fill the fuel with diesel about 50:1 to 60:1.
Lubrication
- Drop lubricating oil or grease at the linkage.
- Add 2Toil to the fuel with a ratio of 50:1 or drop oil outside the cylinder witha syringe for lubrication in the cylinder.
Cooling
The two ends of the plunger pump are check valves. When there is no water or the water pressure is low, tap the check valve with a wooden rod gently.
The principle is that the spring and steel ball in the check valve is rusted or stuck by debris. If knocking is futile, please disassemble it and note to install the check valve from right to left.
Please cool with coolant or water to extend the lifespan of the check valve.
After-sale and Warranty
- We offer excellent after-sales service. If you have any problems in the process of using the product, just contact us in time, we will give a solution ASAP.
- If the engine does not work due to quality problems, we will provide you with a free replacement or maintenance service. If the engine is seriously damaged due to improper operation, we are not responsible for it, but we will try our best to help you repair the engine.
Notes: Non-professionals should not disassemble the engine themselves. We will not provide free service if engine failure or damage is caused by yourself.
How to set up the timing of the valves
1. Turn the cam side toward you, turn the flywheel, and when the piston moves to the bottom dead center (intake stage), adjust the position of the left cam so that the left cam just touches the valve rocker arm and slightly tighten the cam screw.
2. Continue to rotate the flywheel. When the piston moves to top dead center (exhaust stage), adjust the position of the right cam so that the right cam just touches the valve rocker arm and tighten the cam screw slightly.
3. Ignition timing adjustment: After the piston completes the exhaust stroke and enters the compression stroke stage, the optimal ignition setting is at the critical point of completion of the compression stroke, and the ignition when entering the power stroke is the optimal ignition timing.


could you supply me with the unions for the exhaust pipe to the cylinder head and muffler, ie the part that actually screws into the head
also the cap for the fuel tank , not the useless one with the screw down the middle but the push on one that enables fuel mix to be pored straight in
I would still like a instruction manual for this engine as I cannot see the position of the fuel tank and discharge and valve assembly. Thank you